Dryer Not Heating? 6 Causes and How to Fix Each One
Dryer not heating? From a blown thermal fuse to a failed 240V breaker leg — here’s how to diagnose and fix every cause yourself, gas and electric.
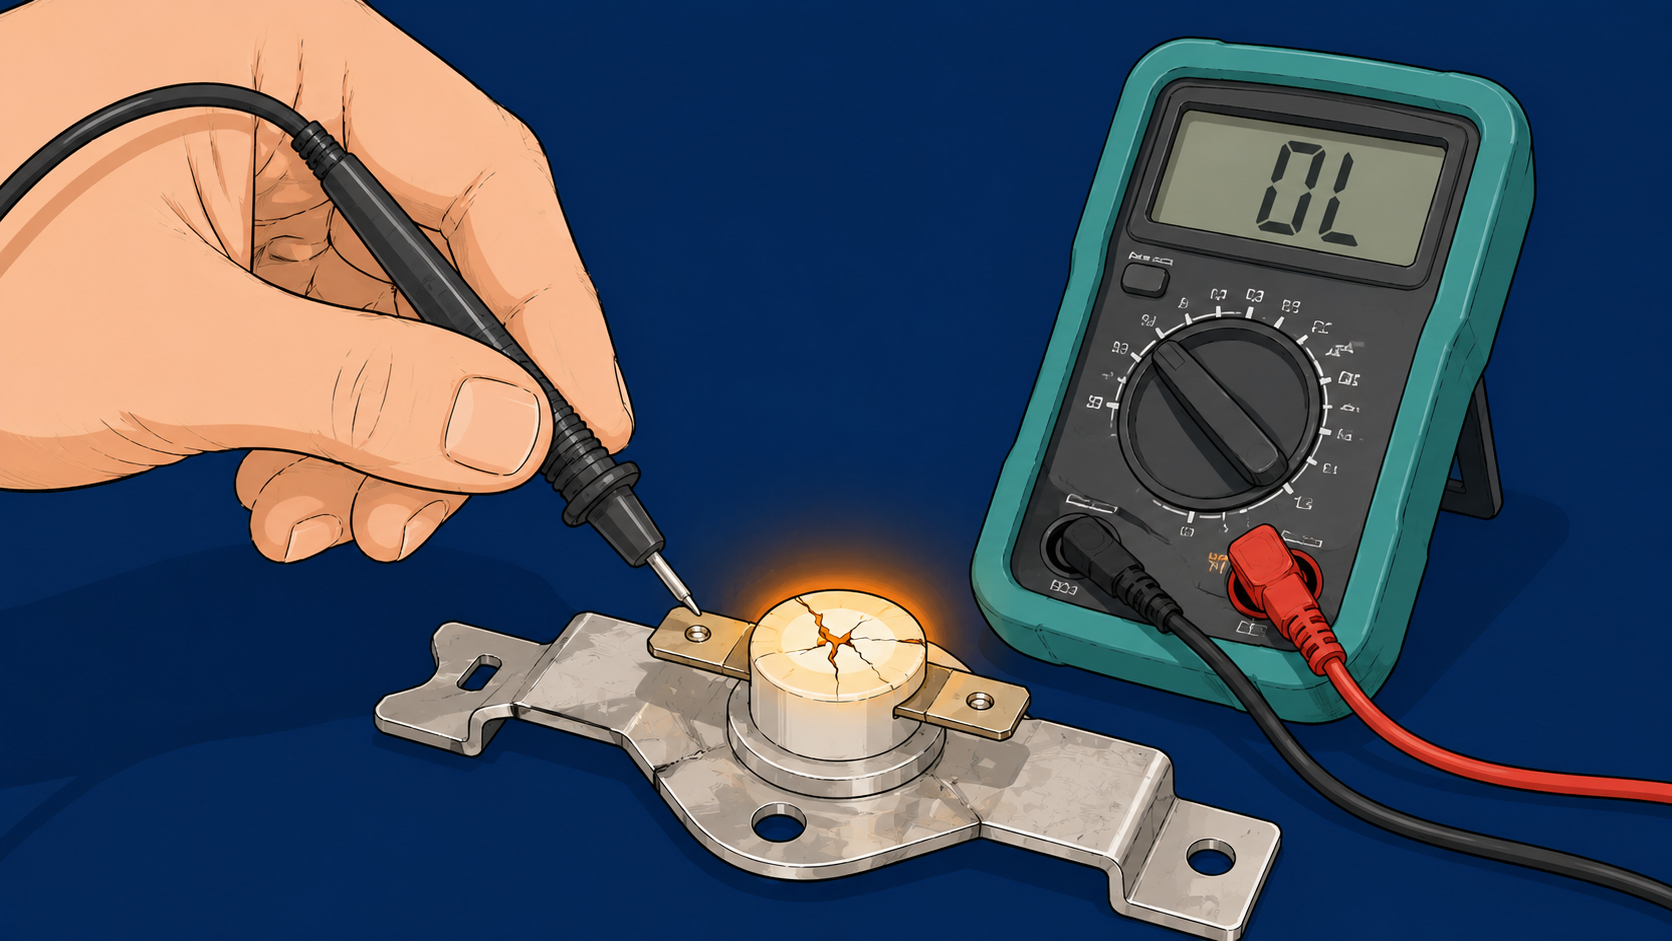
Karen noticed it first — the dryer was running its full cycle but the clothes were coming out damp. Not soaking, just damp, like it had lost half its heat over a few weeks rather than failing overnight. I almost missed it. By the time I checked the thermal fuse with a multimeter, it had already blown. The load sensor data was there the whole time — in the laundry cycle length.
A dryer that runs but doesn’t heat is almost always caused by one of six things: a blown thermal fuse, a failed heating element (electric), a failed gas igniter or gas valve solenoids (gas), a 240V breaker with one leg tripped (electric only — drum spins but zero heat), a clogged exhaust vent, or a failed cycling thermostat. The thermal fuse is the most common cause. Check it first — it’s a $5–$15 part and a 20-minute test.
| Cause | Symptom Clue | Gas or Electric? | DIY-Fixable? | Estimated Cost |
|---|---|---|---|---|
| Blown thermal fuse | Drum spins, no heat at all | Both | Yes | $5–$15 part |
| Failed heating element | No heat, electric only | Electric only | Yes | $20–$50 part |
| Failed gas igniter | Gas smell, no ignition | Gas only | Yes | $25–$60 part |
| Gas valve solenoids failed | Igniter glows, still no heat | Gas only | Yes | $20–$45 for set |
| 240V breaker leg tripped | Drum spins, zero heat | Electric only | Yes | $0 |
| Clogged exhaust vent | Takes 2+ cycles to dry | Both | Yes | $0 |
| Failed cycling thermostat | Intermittent heat | Both | Yes | $10–$25 part |
Cause 1: Blown thermal fuse — test this first
Karen’s observation about the dryer running longer was the diagnostic clue I should have acted on sooner. A thermal fuse is a one-time safety device that blows when the dryer overheats — usually because the exhaust vent is restricted. Once blown, it cuts power to the heating circuit permanently. The drum still spins. The dryer runs a full cycle. Nothing heats.
The thermal fuse on most dryers is located on the exhaust duct inside the back panel — a small white or silver component about the size of a AA battery with two wire connectors. On Whirlpool and Maytag models it’s usually at the left side of the exhaust duct. On Samsung and LG models it’s typically near the heater box at the back right. On our 2017 Maytag gas dryer, it was mounted directly on the burner housing.
To test: unplug the dryer, remove the back panel (usually 6–8 screws), locate the thermal fuse, disconnect the two wires, and set your multimeter to continuity. A functioning thermal fuse reads near 0 ohms. A blown fuse reads OL (open circuit). Replace it — $5–$15 on RepairClinic or PartSelect. Critical: also clear the exhaust vent before running the dryer again. A thermal fuse that blows once will blow again if the underlying vent restriction isn’t fixed first.
Cause 2: The 240V breaker leg — the most misdiagnosed dryer heating problem
Electric dryers run on 240V — two 120V legs from the panel combined. One leg powers the motor (drum rotation). The other leg powers the heating element. If one of the two circuit breakers trips — or one leg fails at the panel — the drum will spin normally but the dryer produces absolutely zero heat. It looks exactly like a heating element failure or a blown thermal fuse. It is neither. This is the problem the Reddit electrical community solved years ago that most appliance guides still don’t address clearly.
To check: go to your circuit breaker panel. Find the double-pole 30-amp breaker for the dryer — two breakers linked together. Even if both appear to be in the ON position, one leg may have soft-tripped. Turn the entire breaker fully OFF, then firmly back ON. Run the dryer. If heat returns, you had a soft-tripped breaker leg. If the breaker trips again immediately, there’s a short in the dryer circuit — unplug the dryer and call an electrician.
The definitive test: with the dryer plugged in and running, use a multimeter set to AC voltage at the dryer outlet. A correctly wired 240V outlet reads approximately 240V between the two hot prongs and approximately 120V between each hot prong and neutral. If you read only 120V between the two hot prongs, one leg has failed at the panel — that’s an electrician call. My 17-year-old can now identify this failure before I even get the multimeter out — it’s that recognizable once you’ve seen it.
Cause 3: Failed heating element (electric dryers)
On electric dryers the heating element is a coiled resistive wire housed in a metal housing at the back or front of the dryer cabinet. When the element fails, it either burns through completely (no heat at all) or develops a partial break (intermittent or insufficient heat).
To test: unplug the dryer and access the heating element. Disconnect the two wires from the element terminals. Set your multimeter to resistance. A working element reads between 8–50 ohms depending on wattage. An OL reading means the element is open (broken). A visual inspection often confirms it — look for a visible gap or break in the coil. On a neighbor’s 2019 Samsung electric dryer, the break was visible as a quarter-inch gap at the highest stress point in the coil.
Heating element assemblies run $20–$50: Whirlpool/Maytag elements (part WP8544771 and equivalents) around $30, Samsung $35–$50, LG $40–$55. Replacement requires accessing the element housing — about 45–60 minutes.
Cause 4: Clogged exhaust vent — often the root cause of everything else
A clogged exhaust vent doesn’t just reduce heat — it causes the dryer to overheat, which blows the thermal fuse. If your thermal fuse is blown, you must clear the vent before installing the replacement. This is the most important single sentence in this guide.
Symptoms of a clogged vent: takes more than one cycle to dry a normal load, clothes come out hotter than usual at the end of a cycle, the dryer cabinet feels excessively hot to the touch, or a burning smell during operation. This is most critical in late winter — the vent cap often gets partially blocked by ice or debris that accumulated over the heating season, which is exactly when thermal fuse failures spike.
To clear: pull the dryer away from the wall, disconnect the flexible duct at the back, and use a dryer vent cleaning brush to clear the full length of duct from the dryer to the exterior cap. Check the exterior vent cap is not blocked by a bird nest, debris, or ice. Clean the vent every 12 months if you run the dryer daily.
Cause 5: Failed gas igniter or gas valve solenoids (gas dryers)
On gas dryers, heat comes from a gas burner ignited by a glow igniter that heats to around 2500°F. Two or three solenoid valves control the gas flow. The failure pattern differs between the two components.
Igniter failure: the igniter doesn’t glow, or glows but goes out without igniting the gas. On our 2017 Maytag gas dryer, igniter failure was gradual — intermittent ignition that got worse over several weeks before failing completely. To test: observe the igniter through the burner access hole during a heat cycle. It should glow bright orange within 30–60 seconds. Test with a multimeter: a working igniter reads 50–400 ohms; OL means replacement needed. Gas dryer igniters run $25–$60.
Gas valve solenoid failure: the igniter glows correctly and reliably, but the gas doesn’t ignite consistently — or ignites for one cycle and fails for several before catching again. Replace the solenoid coils as a set — $20–$45 for most brands. On our Maytag the kit was $28 and replacement took 40 minutes.
Cause 6: Failed cycling thermostat
The cycling thermostat regulates operating temperature by cycling the heat on and off. When it fails open, the heating circuit stays off. When it fails closed, the dryer overheats and the thermal fuse blows. The symptom of a failed-open cycling thermostat is intermittent heat — the dryer heats for a while, stops mid-cycle, then may resume. It’s the most inconsistent symptom pattern and the hardest to diagnose without a multimeter.
To test: locate the cycling thermostat on the exhaust duct near the blower wheel or on the heater housing. Test for continuity at room temperature: a working thermostat reads near 0 ohms. OL at room temperature means it’s failed open — replace it. Cycling thermostat replacements run $10–$25 and are accessible after removing the back panel.
Difficulty and cost summary
| Task | Difficulty | DIY Cost | Pro Cost | Worth DIY? |
|---|---|---|---|---|
| Test and replace thermal fuse | Easy | $5–$15 | $150–$250 | Always |
| Reset 240V breaker leg | Easy | $0 | N/A | Always |
| Replace heating element | Moderate | $20–$50 | $175–$300 | Yes |
| Clear exhaust vent | Easy | $0–$25 | $75–$150 | Always |
| Replace gas igniter | Moderate | $25–$60 | $175–$300 | Yes |
| Replace gas valve solenoids | Moderate | $20–$45 | $175–$275 | Yes |
| Replace cycling thermostat | Easy | $10–$25 | $150–$250 | Always |
When to call a technician
Call a licensed appliance technician if you confirm a failed heating element or gas igniter on a dryer over 12 years old — at that age, repair cost approaches replacement cost for a basic unit. Call an electrician if voltage testing shows one leg of the 240V circuit has failed at the panel. Call immediately if you smell gas when the dryer is running and the igniter is cycling — that’s a gas valve stuck open, which is a fire risk. Don’t attempt to test gas valve components with the gas supply on. Work through the pre-call checklist before booking any service visit.
Frequently asked questions
Why is my dryer running but not heating?
The most common causes are a blown thermal fuse and, for electric dryers, a tripped 240V breaker leg where one circuit leg fails at the panel — leaving the motor running but the heater dead. Test the breaker first (free), then test the thermal fuse ($5–$15 part). These two causes account for roughly 70% of “dryer runs but no heat” calls. Use the diagnosis tool if you’re unsure which to check first.
How do I know if my dryer’s thermal fuse is blown?
Unplug the dryer, remove the back panel, locate the thermal fuse on the exhaust duct, disconnect its two wires, and test with a multimeter set to continuity. A working fuse reads near 0 ohms. A blown fuse reads OL (no continuity). It’s a $5–$15 part at RepairClinic or PartSelect.
How do I test my dryer’s heating element?
Disconnect the dryer from power, access the heating element, remove the element wires, and test with a multimeter set to resistance. A working element reads 8–50 ohms. An OL reading means the element is broken. Also do a visual inspection — a visible gap or break in the coil confirms the diagnosis without a multimeter.
Why does my gas dryer not heat up?
On gas dryers the most common causes are a blown thermal fuse, a failed igniter, or worn gas valve solenoids. Observe the igniter during a heat cycle — it should glow orange within 30–60 seconds. No glow means igniter failure. Glow without ignition means solenoid failure. No heat at all with no glow means test the thermal fuse first.
Can a clogged dryer vent cause no heat?
Yes — indirectly. A clogged vent causes the dryer to overheat, which blows the thermal fuse, which then prevents any heat. Always clear the exhaust vent when replacing the thermal fuse or the new fuse will blow within a few cycles.
How much does it cost to fix a dryer that won’t heat?
Thermal fuse: $5–$15 in parts, DIY. Heating element: $20–$50 in parts, DIY. Gas igniter: $25–$60 in parts, DIY. Professional labor for any of these runs $150–$300. The thermal fuse is the simplest repair in appliance repair — always worth doing yourself first.
My dryer heats but takes too long — is that related?
Yes — slow drying is usually a vent restriction rather than a parts failure. A partially clogged vent reduces airflow enough to slow drying without triggering the thermal fuse. Clean the full vent run first. If drying time normalizes, the vent was the problem.
Karen’s cycle timing observation was worth more than any multimeter reading — a dryer running progressively longer cycles is under thermal stress before the fuse blows. Pay attention to cycle length. It’s the warning the dryer gives you before it stops heating entirely.
Let's Find the Guide.